Install Coil SIM
Installation for 'COILSIM1D License for External Clients
After AVGI provides clients with the COILSIM1D software license, COILSIM1D installation instruction will be followed as below (AVGI provides COILSIM1D network license and uses CodeMeter to protect and license COILSIM1D. )
If license installation is required, please follow the last sections as "Server Machine Set Up ".
User Machine Set Up
CodeMeter Instillation
COILSIM1D licensing works by validating licenses against a license server (instruction is given in User Machine Set Up) by running the CodeMeter license server.
Set the License Server Name
Click the following link: http://localhost:22352/configuration/server_search_list.html. Configuration --> Basic --> Server search list
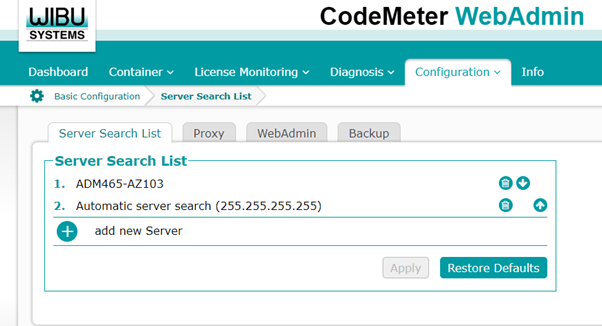
1. Click the + symbol to add a new server and enter the your license server name XXX. Make sure it is at the top of the list.
- Click Add to save the name
- Click Apply to update the CodeMeter settings on your machine
COILSIM1D should now be able to find a license once your machine name has been added to the system.
Troubleshooting if you are not able to run COILSIM1D (mostly the steps below would not be needed)
Adjust Timeout Settings Click the following link: http://localhost:22352/configuration/extra.html and look for the Network Advanced settings.
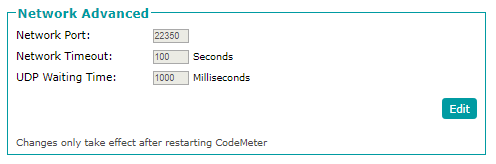
Click the Edit button and change:
- Network Timeout to 300 seconds
- UDP Waiting Time to 10000 milliseconds
Then click Apply to save the changes.
Unable to Connect to Server
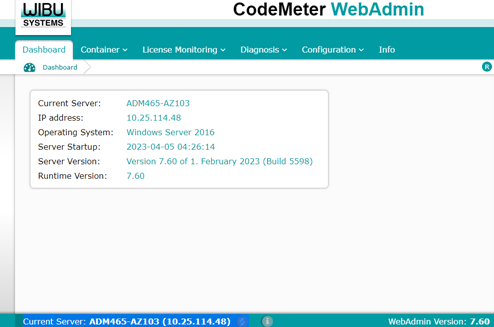
There is a toolbar at the bottom of the WebAdmin screen that shows Current Server:

Yours may show Localhost as the server. The field is a button so can you click it and see if it detects office machine – XXX(your host machine). You will see a list appear if it can find the server: select (your host machine). if it does and click Apply. If it does not then try increasing the network timeouts on the Configuration > Advanced page, Extra tab. Try a network timeout of 150 seconds and a UDP Waiting time of 3000 Milliseconds for starters.
You need to install CodeMeterRuntime64 to run COILSIM1D. CodeMeterRuntime64 needs to be installed both on user and host server machine. The procedure of installing on host server machine is provided by AVGI as Server Machin Set Up section.
Current server is changed from local server to Hosting server after clicking the highlighted current server tab
->
Verification of the activation of the license
To check the activation of the license, browse to the following URL with any internet browser.
http://localhost:22350/container/cmcontainer_details.html. The following window appears, listing the activated licenses of AVGI on your CmContainer. The number of licenses and the expiration time of the licenses are also visible in this window.
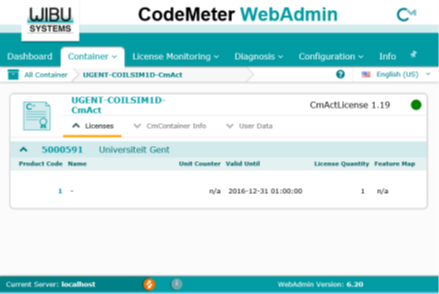
If there are no entries in this window, the activation of the license was not successful. Contact AVGI to resolve the problem.
You can find the latest install materials at https://downloads.kbcat.com/SitePages/Petro-SIM.aspx?RootFolder=%2FSIM%20Suite%2FCOILSIM1D%20for%20Petro%2DSIM%2FCOILSIM%20Software&FolderCTID=0x012000747CA0C6E476364E9A346ADF5BA85FE8&View=%7B7139CC86%2DD2E6%2D486F%2D9691%2DB5920958B39F%7Dl
which contains the following files:
- COILSIM1D v3.9.2.exe - the installer for COILSIM1D
- Release notes COILSIM1D v3.9.2.pdf – the release notes for COILSIM1D
- CodeMeterRuntime64.exe – security/license installer for COILSIM1D
You need to install both COILSIM1D v3.9.2 and CodeMeterRuntime64 to run COILSIM1D. They can be installed in any order. CodeMeterRuntime64 needs to be installed both on user machine and host server machine. The procedure of installing on host server machine is provided by AVGI as below section.
Access Permission You will need to have full access to the c:\programdata\coilsim1d directory. COILSIM1DEmphasized
COILSIM1D reads and writes files to this directory.
When installed with the default settings, this help file can also be found on the following location: C:\Program Files (x86)\COILSIM1D\manualCOILSIM1D.pdf
KBC.COILSIM1D Extension Setup
You can install the latest version of KBC.COILSIM1D extension (v1.0.84) from KBC Software Download Centre https://downloads.kbcat.com/SitePages/Petro-SIM.aspx?RootFolder=%2FSIM%20Suite%2FCOILSIM1D%20for%20Petro%2DSIM&FolderCTID=0x012000747CA0C6E476364E9A346ADF5BA85FE8&View=%7B7139CC86%2DD2E6%2D486F%2D9691%2DB5920958B39F%7D
Request needs to be sent to software support to update their Petro-SIM with COILSIM Extension license.
Note, if you have an older extension version, you need to un-register the extension and then un-install the extension first, before installing the new version. The KBC.COILSIM1D extension will be automatically registered by the installer. This extension version is supported in Petro-SIM v7.2 to v7.5.
This completes setting up the license.
Run COILSIM1D
Run a COILSIM1D from the Start.
The best way to test the set-up of the license server and the client computers is to perform a simulation using COILSIM1D. In case the configuration was successful, COILSIM1D should run normally.
In case the configuration was not successful, the following error will be displayed by COILSIM1D (Figure 7). Any other error is not related to the license server configuration but rather to the installation of COILSIM1D itself or to the settings of the COILSIM1D simulation you are currently running.
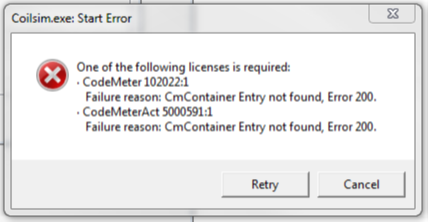
In this case, verify the procedure described above. If the problem is not resolved, contact KBC Technology Helpdesk.
Run Petro-SIM COILOSIM1D Extension
Open Petro-SIM flowsheet included COILSIM1D extension.
Open the COILSIM1D extension furnace.
Tweak any variable inside the extension, if the flowsheet solves without any error, its working fine.
Otherwise, contact KBC Technology Helpdesk.
Who to contact in case of questions and problems. The following people will assist you in solving your configuration issues. Please address any questions or problems you might encounter to these persons.
KBC Technology Helpdesk <software@kbc.global>
If any issues, KBC support will coordinate with following member of AVGI:
- Ismaël Amghizar : Ismael.amghizar@avgi.be and cc Ghoncheh.Rasouli@kbc.global
Server Machine Set Up (License Server)
1. After AVGI provides instruction and AVGI-COILSIM1D-CmAct.wbb file which user need in step 1 of installation instruction. 2. After user has received the AVGI-COILSIM1D-CmAct.wbb from AVGI, generating an activation file by user is required 3. user must follow (step 2) of instruction and send AVGI an activation file (XXXX.WibuCmRaC), which is generated by the user. The instruction for generating an activation file is provided in Installation Instruction COILSIM1D. 4. Once AVGI has received the activation files, they will provide the user with activated license file. Now user can import the provided activation file in step 3.
- IMPORTANT** Before you proceed, please make sure that you have a valid CoilSIM1D activation license file (XXXX.WibuCmRaC) and completed step3 of installation instruction COILSIM1D.
From AVGI's License Instruction
CodeMeter Runtime Kit COILSIM1D licensing works by validating licenses against a license server (instruction is given in User Machine Set Up) by running the CodeMeter license server. CodeMeter Control Center will host the network license on the license server.
The client computer should run the latest version of CodeMeter Runtime Kit provided by Wibu-Systems AG and available on the following website: http://codemeter.com/us/service/downloads.html CodeMeter Control Center, part of the CodeMeter Runtime Kit, will host the network license on the license server. Once installed, a detailed manual is provided for CodeMeter Runtime Kit, available in the Start Menu -> All Programs -> CodeMeter -> Documentation -> CodeMeter User Help.html. When installed with the default settings, this help file can also be found on the following location: C:\Program Files (x86)\CodeMeter\Runtime\help\CmUserHelp\index.html
The below instruction is provided by AVGI.
All actions described below should be executed on the Server PC, i.e. the computer which will host the license.
AVGI will provide the file “AVGI-COILSIM1D-CmAct.wbb” to follow the license installation procedure directly to Client. (Need to check with AVGI, if this file is unique to each client or same for all. If it is unique for each client, AVGI will directly send the file to client and copy KBC. For YMA, KBC was in between, AVGI provided it to KBC and KBC sent it to YMA. However, if it is same for all, It is better to be provided by KBC along with installation instructions).
1. Create a host environment for the license Open the CodeMeter Control Centre by right-clicking the CodeMeter icon in the icon bar next to the clock and selecting ‘show’. If no license is active, the following screen is obtained.
->
Figure 1: Welcome screen of CodeMeter Control Centre
At this point, a host for the license will be generated. This is the equivalent of an empty USB dongle. Locate the file ‘AVGI-COILSIM1D-CmAct.wbb’ supplied by the AVGI in your file explorer. Left-click and hold to drag the file to the white rectangular box in CodeMeter Control Center, indicated in the figure below by the dark-red rectangle.
->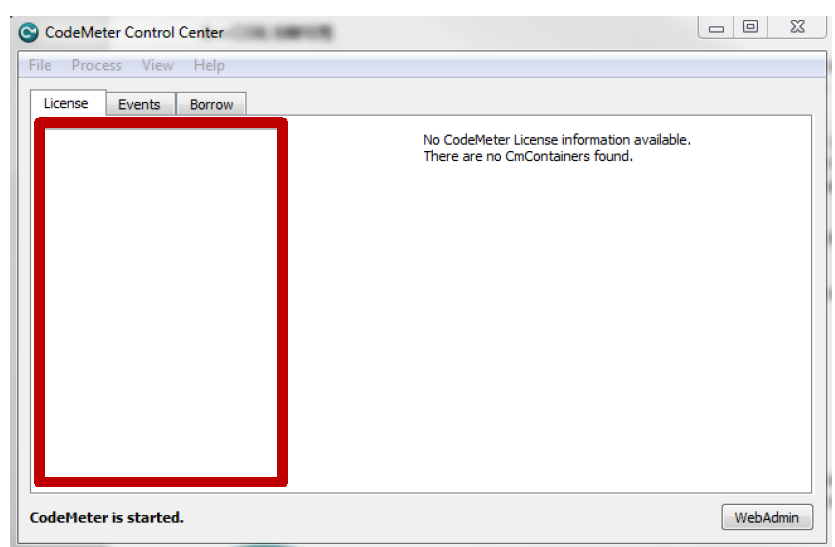
Figure 2: Area to drag-and-drop the AVGI-COILSIM1D-CmAct.wbb file in CodeMeter Control Center.
When imported successfully, an empty license container is created with the name AVGI-COILSIM1D-CmAct
2. Generate a license request file – Proposed to be done by AVGI (User will create the file and send to AVGI directly.)
In this step, a license request file is to be generated using CodeMeter Control Center. This license request file contains information about the license host machine on which the license will be activated.
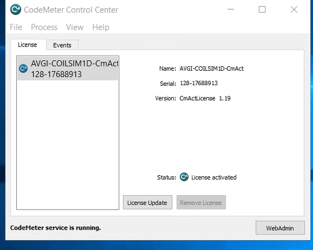
Open CodeMeter Control Center by right-clicking on the CodeMeter icon in the icon bar next to the clock and selecting the option ‘open’. The following screen opens. Click the button License Update
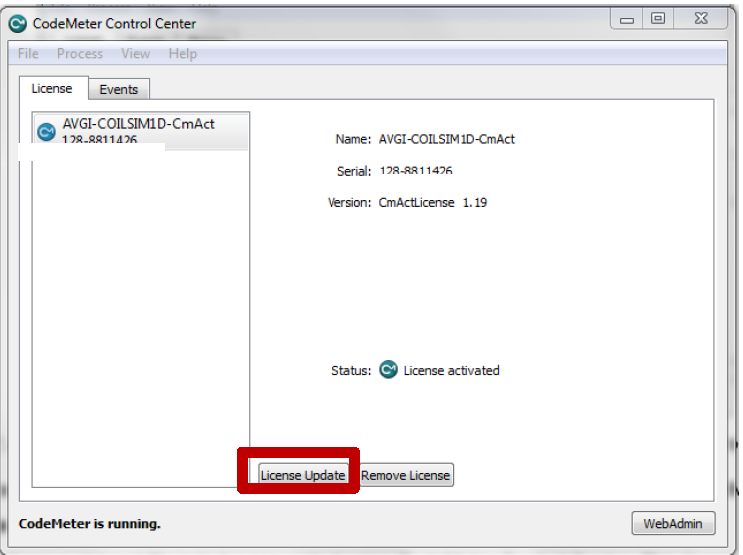
Figure 3: Generate license request in CodeMeter Control Center (part 1)
A second window opens, that is the CmFAS Assistant window. Click ‘Next >’ so pass the Welcome window. The CmFAS window changes to the following (Figure 4). Maintain the choice for ‘Create license request’ and click the ‘Next >’ button again.
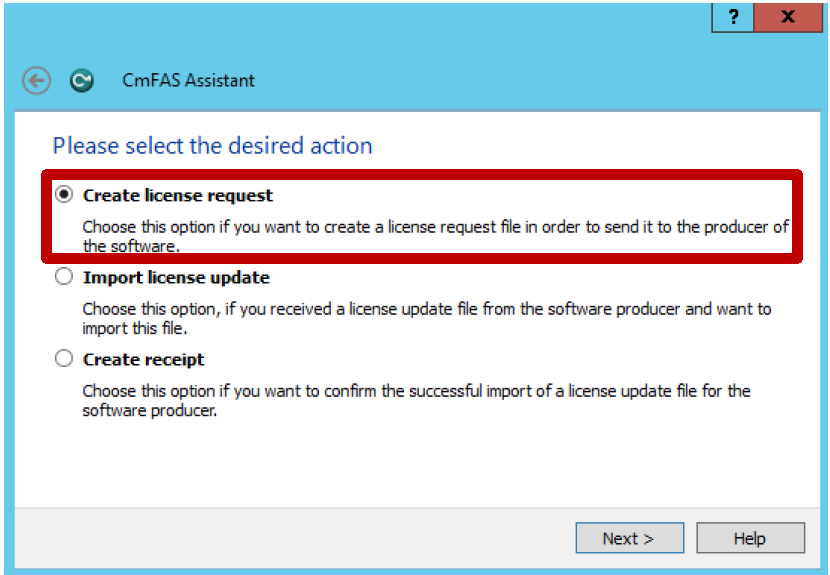
Figure 4: Generate license request in CodeMeter Control Center (part 2)
In the following Window, you can select a location and a name for the license request file that is to be generated. Do not change the extension of the file, that is the. WibuCmRaC. Click ‘Commit’ once the desired file name and file location are specified.
After clicking ‘Commit’, the license request file with extension. WibuCmRaC is created in the specified location.
3. Activation of the license – Proposed to be done by AVGI (Directly send the file to user and Copy KBC.)
Based on the license request file generated in the previous step, a license activation file will be created. This file is tailored to the digital fingerprint details specified in the license request file. It is hence not possible to use the license activation file on any other machine except on the machine on which the license request file was generated. The file has the .WibuCmRaU extension and will be sent to you via e-mail.
To activate the license, open CodeMeter Control Center by right-clicking on the CodeMeter icon in the icon bar next to the clock and selecting the option ‘open’. Click the button License Update
Click ‘Next >’ in the CmFAS Welcome window.
Select the option ‘Import license update’ (Figure 5)
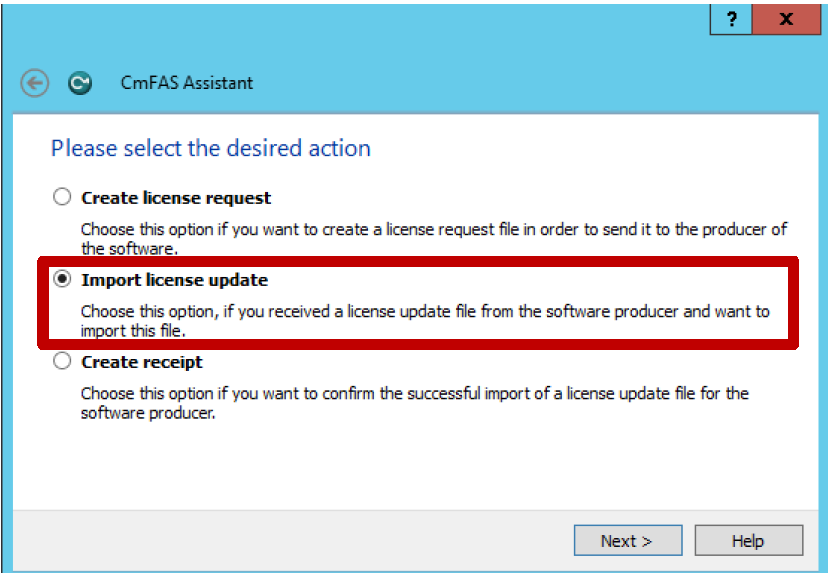
Figure 5: Activating the license in CodeMeter Control Center
In the next window, locate the license activation file with extension .WibuCmRaU sent to you via e-mail. Once the correct file is specified, click the ‘Commit’ button. The license is now activated on your machine.
4. Modification required for Network license:(Ask AVGI if it’s needed)
Modification in server:
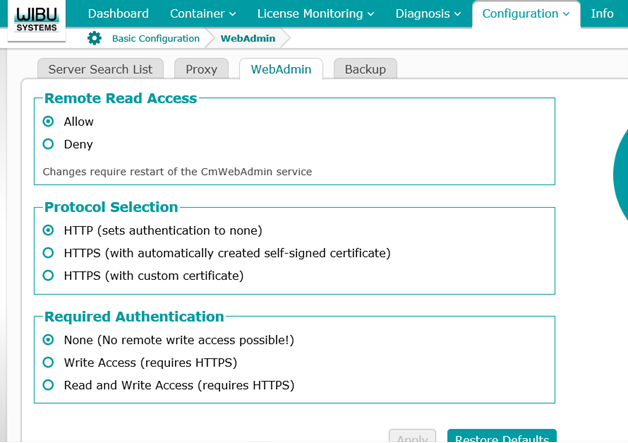
Open the WebAdmin from CodeMeter control centrer in Server, by cling the Webadmin button present at the bottom right corner of the control centre.
->
Under configuration Tab --> Basic Configuration Web Admin -> Remote read access is changed to "ALLOW"
->
Under configuration Tab --> Server configuration Server Access -->Network server to be "ENABLE"
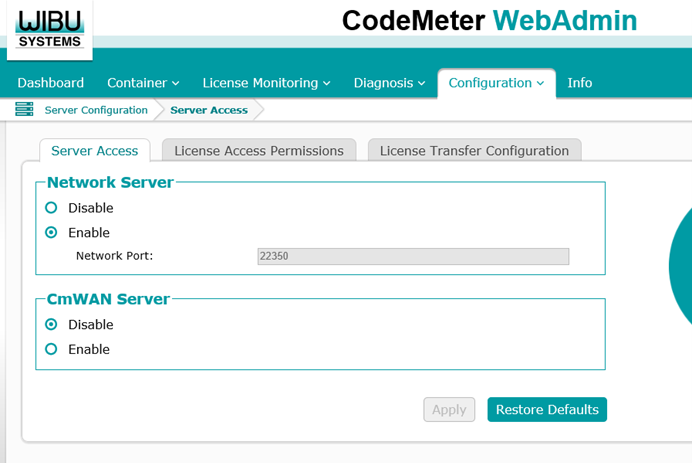
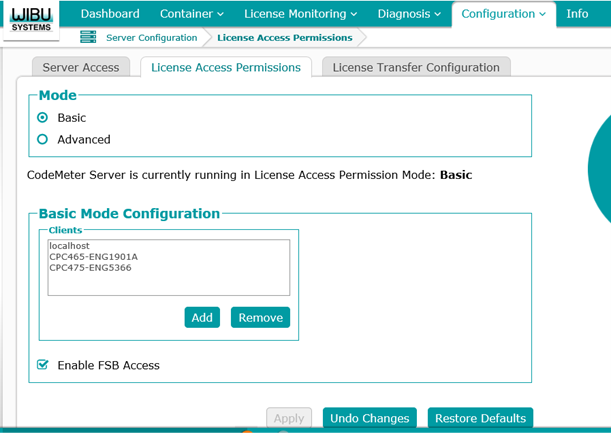
License Access Permissions --> Add Client machine name by clicking ADD button on basic mode configuration column ( Advise to use machine name not IP address for YMA due to their dynamic IP).
- Enable FSB access
Under configuration Tab --> Advanced Extra -> Change the Network advanced as per below Network port: NO CHANGE Network Timeout: 150 secs UDP Waiting time: 3000 Millisecs
->